
I talked to one of my aunts a while back and told her I would post a tutorial on how to wrap a box in fabric. It has been a while (maybe a month or two) Sorry Auntie, hope you can forgive me.
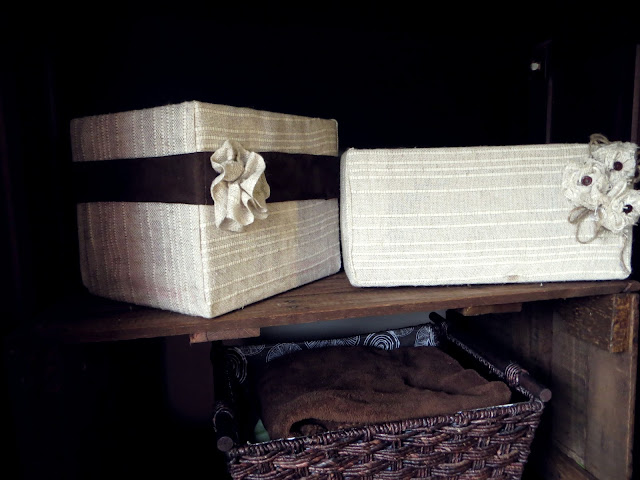
These are some of the first boxes I did. After doing these I came up with a easy way to cover the inside and outside of the box.


These are some of the first boxes I did. After doing these I came up with a easy way to cover the inside and outside of the box.

These are the two boxes I started out with. Any size box will work, but they need to be sturdy.
Step 1:

I used two pieces of fabric. One for the outside, and one for the inside.
Step 2:

To measure how much material you need, put the box in the center of the material. Then pull the fabric over to the inside. Measure about two to three inches from the top of the inside. Then cut the material where you measured.The next part is hard to explain so I drew on the material.
These red lines line up with the corners of the box, you will need 1 inch more. Look down in step 9 to see how it will work.You will end up one inch away from the box. I cut both pieces of fabric at the same time.
Step 3:

As you can see here, I left an extra inch on the sides, so later I can fold them. Cut at an angle up to the box.

This is the piece I used for the lining, it's probably better to have the inside and outside material match but this is what I had on hand.
Step 4:

Fold all the flaps of the material in.
Step 5:

Arrange the fabric to see if it fits. Then I hot glued the fabric to the bottom of the box,one side at a time.
Step 6:

After the bottom is glued down you can pull the flaps out and arrange, notice in the next step how I folded the material before I glued it.
Step 7:

Glue down these flaps as well, now the inside of the box is done.
Step 8:

Place the box in the center of the fabric.
Step 9:

Glue the bottom first than the sides.When you get to the sides you glue one side around the box and the other one as shown in the picture. You will get a nice finished look.

This is what You will end up with.
Step 10:

Cut a slit up to the box, like shown. When you glue down make sure you fold the materiel so that when you are finished you have nice finished edges.

Step 11:

I added some trim to the outside of the box, but you can decorate it however you want. On some other boxes I added a ribbon and some flowers that I made.
Step 12:

I glued the edge so the seem doesn't show.

And here they are all finished. It's pretty simple. This one is covered with the same fabric inside and out, I like this look.It cost me very little since I had the fabric from a yard sale. I covered three boxes inside and out for about two dollars!

I also painted some dollar store containers and boxes with chalkboard paint and they are holding up well so far !

It looks so nice after all the work we put into it. I just wish our pantry could stay this organized.

One thing I didn't mention before is that if your fabric is not very thick you should probably give your boxes a coat of spray paint before you cover them. You can see a little of the design showing through on the top box and it annoys me a little bit. Hope this is helpful. I would love to hear from you if you decide to cover a box of your own!
This Project Has Been Featured By:

Update (02-15-13): I’ve entered this project in a contest. Please help me get nominated by clicking on my submission.
Go to this link >;>;>;East Coast Creative’s Creating With The Stars and scroll down to number #165. That’s me! And just click on the link. Thank you for your help!


Wow: You're a genius!! I am not particularly crafty, but think I might be able to tackle this. Even if I blow it, the damage to my wallet will be minimal. Thank you!
ReplyDeleteLooks awesome! I need to do something like this. Thanks for sharing with us!
ReplyDeleteWhat a great idea. Definitely going to do this. I'll post back when it's done.
ReplyDeleteDefinitely an easy craft. I would love to see how it turns out!
ReplyDeleteI love that you have a box set aside for chocolate chips. Yum! Your boxes turned out great. I've been meaning to make some for the top of my kids closets to help organize their out-of-season clothes and such. Excellent tutorial!
ReplyDeleteThis is such a great idea! And your tutorial is very explicit, thank you...I'm pinning this!
ReplyDeleteDebbie :)
What a great idea to spruce things up a bit!
DeleteMade a 'sunbox' for my notebook this way. Thanks for the idea!
DeleteGreat step by step instructions! I love the fabric! Found you through Roadkill Rescue!
ReplyDeleteHi, I came by from Roadkill Rescue - your boxes look great!
ReplyDeleteI'm so glad I found your tutorial. Yes, there are a lot of others around, but this is by far the best because there's NO SEWING INVOLVED! I bought a bunch of fabric a few weeks ago to make a bunch of boxes like these, but stopped at the point where the other tutorials had me sewing the inside panels.
ReplyDeleteBy the way, I've been using Aleene's Tacky Glue that was suggested from another tutorial, instead of a hot glue gun. It works great!
I'll be voting for you at that East Coast's website every day for you! I really think you deserve it.
Thanks so much, I could use all the help I can get!
DeleteHi,
ReplyDeleteI will definitely try this project when I get some free fabric. I love it! In the meanwhile, I want to paint my Dollar Tree bins, like you did with the Chalkboard paint. Did you use spray paint or regular paint? Did you prime it or no? Can you tell me your process?
I used regular chalkboard paint in a can, but you could use spray paint. I used the brush on paint because I think you get a lot more for your money from the brush on paint. And, no, I didn't use primer. All you have to do two coats, and make sure it is fully dry before you use them because the paint could scratch off. Good luck!
DeleteMichelle
DeleteHi, I used a large cardboard box to cover the cat litter tray years ago. Removed one set of flaps, cut out a U shape to allow entry and turned it over for use. Painted inside and out with two layers of the same emulsion left from the internal house walls and a good coat of pva glue to keep moisture off. A lot stronger than a raw box, cost nothing and matched the porch to be unobtrusive. Only cost an hour or two in labour and lasted around 5 years.
I like the idea of fabric covers for househod storage. Good tutorial. Thanks.
hmm... might be good to add a captcha to stop those "anonymous" spammers...
ReplyDeletehttp://www.askdavetaylor.com/adding_captcha_to_bloggercom_blogs_to_minimize_comment_spam.html
thnks its lovely....
ReplyDeleteThanks for share this post I also share with you something hope you like my post. To make sure your household goods arrive at your new home without a scratch, start with purchasing the right packing supplies. This is an area where you can cut down on cost, if necessary, just remember that buying the right supplies from the beginning will save you time and energy. Thanks
ReplyDeleteBuy Packaging Supplies
Excellent tutorial, very easy to follow. Thank you!
ReplyDeleteExcellent tutorial. I bought a bunch of banker's boxes to get my house organized, but my shed is stuffed full. This will be so handy to use in the house! Thank you so much for sharing.
ReplyDeleteAlso, I love the Aleene's Glue suggestion. There's even a Quick Dry option on that. Thanks to T to the Essa!
One suggestion I have is making your own chalkboard paint. Martha Stewart's "recipe" is here: http://www.marthastewart.com/271574/custom-color-chalkboard-paint but basically it is 1 cup latex paint to 2 tbs unsanded tile grout. That's all it is!
Again, many thanks!
Thank you so much for this tutorial. it is indeed very helpfull especially for those who had lots of boxes to throw...thanks again!
ReplyDeleteI did this with wrapping paper and mod podge on some old diaper boxes to hold DVDs in my tv cabinet, nearly 8 years ago. I had purchased the wrapping paper on clearance at Target after Father's Day. They are still holding up and look great. I am going to give fabric a try!
ReplyDeleteI really enjoy reading and also appreciate your work.
ReplyDeletemoving box rental
I am a single father of two boys , 3and 7, on a budget. I came across your article through apartment therapy. I loved the idea and I'll also try my hand at it. Looks like a good place to store my boys toys and stuff. Thank you!
ReplyDeleteWallpaper purchased from big box stores in clearance bins also works well for covering boxes. If the glue is decent on it you only need to dampen paper with a sponge, and press. I cut the paper the same way as Emily did.
ReplyDeleteThat's a good idea, I will keep that in mind when I garage sale!
Deletegreat idea i am going to do this tomorrow thanks
ReplyDeleteWow... my daughter-in-law just offered me a bunch of Bankers boxes that she was going to throw out, and I grabbed them because I've just started a big organising project in my home...! The plain boxes would work fine but PRETTY BOXES would be nicer....! Thanks for the instructions.....even this 75 year old woman can follow them... :)
ReplyDeleteI agree, I'd much rather look at pretty boxes too!
DeletePure genius...simple and creative
ReplyDeletefabric cube boxes that fit into tho the cubes perfectly
ReplyDeleteI've been doing it wrong all this time. Thanks for the post!
ReplyDeleteAgain became a victim of standing close to me common OBI-moving boxes. Folding Boxes
ReplyDeleteThis a a great writing this website. I really hope to view the same high-grade content by
ReplyDeleteyou later on as well.
wooden dog crate cover
Well, La dee dah! I have a kazillion heavy medium size boxes at my disposal. My husband is on Peritoneal Dialysis, sooooo, we gots lots of boxes. hahaha. This will be fabulous for storage in my sewing room. I made doll furniture, but this will be so much more practical and easier. Hmmmm, I guess that this means a trip to the fabric store or shopping online @ fabrics.com. :) Thank you for the great tutorial.
ReplyDeleteuse bedsheets from safers or garage sales , a lot of material for pennies
DeleteWell, La dee dah! I have a kazillion heavy medium size boxes at my disposal. My husband is on Peritoneal Dialysis, sooooo, we gots lots of boxes. hahaha. This will be fabulous for storage in my sewing room. I made doll furniture, but this will be so much more practical and easier. Hmmmm, I guess that this means a trip to the fabric store or shopping online @ fabrics.com. :) Thank you for the great tutorial.
ReplyDeleteThis is Wow! A realistic and creative idea. The steps are well tailored out for understanding. I got an idea here now to handle carton design I was thinking of doing at home - a home made business I was thinking of doing. Thanking you so much.
ReplyDeleteYour blog is very interesting. Thanks for sharing nice information on Online Fabrics | Georgette Fabrics
ReplyDeleteThank you for this tutorial! I will be using this for a craft with a group of ladies soon. I like the spray paint tip at the end too.
ReplyDeleteIt is amazing and wonderful to visit your site. I've learn many things from your site. keep it continue. Thank you for sharing this information with us.
ReplyDeleteRegards
DoDo Packaging
Fantastic blogs shared in this post which are stuff with good information and worth to share with others so thanx you very much for sharing the great information with us.
ReplyDeletePlus Printers
hi me from custom boxes with logo. You Post is about tips to cover box in fabric is informative. I want to bookmark your site. Your blog design is good.
ReplyDeleteregards
bath bomb boxes
People nowadays don’t have Vape cartridge boxes with them because of addiction but it is also considered to have a style icon in the present era.
ReplyDeleteFantastic blogs shared in this post which are stuff with good information and worth to share with others so thanx you very much for sharing the great information with us.
ReplyDeleteFrom custom cream boxes
ReplyDelete.My idea of taking part in these competitions is not exactly being the winner. There is an experience factor you acquire from these competitions that will be so valuable in writing books. That is the main concern of mine.
hair extension boxes
Amazing! Your blog is very interesting, If you are looking for Custom Packaging Boxes Service for your Business Promotion, So PrintCosmo is the best Choice for Packaging Service Especially in Custom Folding Boxes with Custom Design and Free Shipping Worldwide.
ReplyDeleteCosmetics Packaging: Beauty care products are a colossal and exceedingly focused industry.
ReplyDeleteCustom perfume Boxes is available at amazingly low prices with the best work. We have a large number of blank perfume boxes and bulk of perfume packaging in all over the USA.
ReplyDeleteCustom cosmetic Boxes is available at amazingly low prices with the best work. We have a large number of blank custom printed cosmetic boxes and bulk of cosmetic packaging in all over the USA.
ReplyDeleteCustom Lipstick Boxes is available at amazingly low prices with the best work. We have a large number of blank lipstick boxes and bulk of lipstick packaging in all over the USA.
ReplyDeleteGood job! Innove supplies cardboard rigid gift boxes with lids, paper wine bottle gift boxes, cardboard boxes for flowers, cardboard jewellery gift boxes with lids and decorative christmas gift boxes with lids etc.
ReplyDeleteHi, I came by from Roadkill Rescue - your boxes look great!
ReplyDeletecustom Packaging Boxes usa
This comment has been removed by the author.
ReplyDeleteThis comment has been removed by the author.
ReplyDeleteThanks for this.However i like your blog how to cover Boxes .
ReplyDeleteIts very helpful for me to cover Boxes.
ReplyDeleteVery helpful in Packaging Boxes
ReplyDeletei have read almost all of your posts and they are so informative thanks for sharing such informative posts. Hope that you will also share such posts in future
ReplyDeleteGreat.
ReplyDeleteThanks For sharing this Superb article.I use this Article to show my assignment in college.it is useful For me Great Work. How to Get Mold Out of Fabric Shower Curtains
ReplyDeletethnk u
ReplyDelete"it is useful to do needlework but not so much as writing essays that also apply to creative hobbies!So you should check the info about the best essay writing service Orderessay in order to understand why this service is the best on the market now!"
ReplyDeleteWow so nice article and post of Custom cardboard Boxes.Thanks for this beautiful post
ReplyDeleteYour blog helps me to cover my custom packaging boxes . Thanks for posting.
ReplyDeleteWow! Such an amazing craft. You always did splendid job. your blogs always helps me alot. Thank you
ReplyDeleteIt is amazing and wonderful to visit your site. I've learn many things from your site. keep it continue. Thank you for sharing this information with us. i can't stop myself for posting comment on your site
ReplyDeleteThanks so much for the good post and keep continue writing
Wow! This is very amazing post about the importance of how to cover a fabric in Custom Boxes. Most of the people don't know about this. Thanks for this amazing post!
ReplyDeleteGreat idea to reuse your cardboard Boxes in very creative way and making interesting crafts from that Awesome!!!!
ReplyDeleteGood Job,thanks for sharing this informatie article with us
ReplyDeleteYour blog is very nice thanks for sharing Then just very nice, thanks for sharing to us Enjoyed every bit of your blog.Really looking forward to read more.
ReplyDeleteCustom Packaging Boxes Wholesale
Custom Boxes
Slider Boxes
Mailer Boxes
Custom Soap Boxes Wholesale
Fancy Hard Boxes Wholesale
you can reuse product boxes
ReplyDeletemade from cardboard in a very creative way to store things or storage All you need just to customize box by following the above steps mentioned in the article and make alluring customize storage boxes
I Found the write place after lot of search on google i am in write place where i can get an informative thing. Thank you for postingthis amazing post and trick and keep continue writing these amazing tricky informative blog. i am also an business men i provide services related to custom boxes if you went to buy buy custom boxes in usa then visit over site
ReplyDeleteLove all of the tips and the shower is adorable! You have so many details and everything came together so cute.
ReplyDeleteThanks a lot for this article, I very interested with this published. Your post is incredibly fantastic with a
lot of interesting information and impressive posting style. i have lots of question in my mind regarding gift packing design after reading this post lot’s of question clear on my mind.
Wonderful blog. Thanks for sharing the ideas for covering a Custom Corrugated Boxes for shipping purpose.
ReplyDeleteGood Job, thanks for sharing this informative
ReplyDeletetopic with us
At SleekBoxes.com, we believe that extra care is required when it comes to Custom Luxury Boxes. A more valuable, less invasive process where each detail matters. We're obsessively passionate about it, and our mission is to help people achieve it Promotion Boxes
ReplyDeleteAmazing! You did a Splendid Job. This post is the exact match of my requirements. I was looking for it. Thanks for sharing this post. you are very creative and making an effort for us. people you like this, please share these posts. Really appreciated!
ReplyDeleteMysterious charity boxes
This comment has been removed by the author.
ReplyDeleteYour blog help me to cover my custom packaging boxes with fabric.
ReplyDeleteGreat blog and very helpful for me to cover my custom printed packaging boxes .
ReplyDeletepackaging for gifts
ReplyDeleteI really loved the post. Its amazing and totally informative. If you are looking for the Cannabidiol Boxes than Custom Boxes Mart can help you as it is an official packaging company that offers you free shipment and free proofreading. Our boxes can ensure product safety and at the same time, attract your customers. Our professional team is always ready to serve you and guide you.
ReplyDeleteI really loved the post. Its amazing and totally informative. If you are looking for the Cannabidiol Boxes ) than Custom Boxes Mart can help you as it is an official packaging company that offers you free shipment and free proofreading. Our boxes can ensure product safety and at the same time, attract your customers. Our professional team is always ready to serve you and guide you.
ReplyDeleteI have read your article; it is very instructive and valuable to me. I admire the valuable information you offer in your articles. Thanks for posting it.
ReplyDeletePopcorn Boxes
Pillow Boxes
Wine Boxes
Perfume Boxes
The Custom Boxes Print.us has opened the new passes for custom printed boxes. We have a high quality of personalized packages with 4 color digital and unique box printing services.
ReplyDeleteThe Custom Packaging Boxes
Custom Boxes Wholesale
Business Cards
Mailer Boxes
Cute storage boxes...Innove packaging offers velvet-covered cardboard gift boxes!
ReplyDeleteAmazing! Packaging of box was great.If you are looking for some unique idea or some different ideas just Visit Site
ReplyDeletecheck this website, this have all the product packaging solution They have affordable prices.
ReplyDeleteThank you for amazing post
ReplyDeleteGreat Information sharing .. I am very happy to read this article .. thanks for giving us go through info. Fantastic nice. I appreciate this post. and thank you for sharing an amazing article…
ReplyDeleteThe Custom Packaging Boxes
This is a great idea to beautify your boxes. I want to appreciate you for this creativity as this give me an idea to pack the gift for my friend. I am also interested in other printing techniques and come across this piece of information. Hope you will like Business Card, Flexographic Printing, What is Screen Printing
ReplyDeleteAt Buy Fake British Pounds, we are the best and Unique producer of Super Undetectable Fake Banknotes and International Documentation Services like Fake and Real Driver's License, Certificate of Nationalization
ReplyDeleteThanks for sharing a wonderful idea.
ReplyDeleteSuch a great idea of covering boxes into fabric, A dedication of thankfulness is all together For Sharing! by then in a general sense Visit
ReplyDeletefolding packaging boxes
Very informative site and posts are there. Thanks for sharing this with us.
ReplyDeleteRegards!
Christmas Boxes packaging
Hey, Thanks for sharing this post. Cardboard Boxes are the most important part of the paroduct packaging and shipping. Custom made cardboard boxes can easily used for many thing, if you order those from some professional custom printed boxes company.
ReplyDeleteOur provided custom boxes with logo are finest, supreme, and outstanding from every angle. We manufacture these high quality boxes in a complete range of styles with a wide variety of print finishes such as lamination, foiling, embossing and spot UV options With our endless range of box designs, we make sure that customers get all their packaging needs to be fulfilled under one roof. Furthermore, our excellent custom cardboard boxes will make your items look more appealing to the eyes, and create a brand image that will stand out from the business competitors.
ReplyDeleteWe manufacture luxury packaging boxes from scratch to add more value to the product and to make it stand out from the crowd. Our custom gift boxes offer a number of value-added benefits like we can design them in any shape, from small size to large, or color like silver, gold, blue, large, green and purple according to the customer requirement.
ReplyDeleteAre you looking for high-end solutions for your luxury boxes? Our boxes only made with the High Quality material, but also highly durable, reusable and can be accessible from us in different styles and thousands of color combinations according to your requirement. Our luxury candle boxes wholesale are an exceptional choice for your Packaging requirements and help you save money on shipping!
ReplyDeleteLooking for vape packaging solutions? Our vape packaging boxes are the ideal way to package vape products. Additionally, we have a wide range of vape cartridge packaging boxes to protect, complement and to make your products stand out in terms of branding and presentation. Our printing style will definitely grab the attention of your customer and will make them think about buying the vape products once more.
ReplyDeletethanks for sharing it.
ReplyDeleteFolding Boxes
Custom Folding Boxes
Printed Folding Boxes
Printing Packaging Folding Boxes
Wholesale Folding Boxes
USA Folding Boxes
Our service has been very supportive to our customers and especially in solving their problems and providing them with packaging boxes which are fully credible and worthy of their trust.
ReplyDeletelipstick boxes
Custom Eyeshadow Boxes
Custom Eyeliner Boxes
Mascara in a Box
Best Makeup Subscription boxes
custom makeup subscription boxes
We produces high quality Custom Product Boxes in a complete range of styles according to the customer requirements in a wide variety of print finishes such as lamination, foiling and embossing. Our boxes not only protect the products, but also make them stand out in terms of design, branding and presentation.
ReplyDeleteThanks for sharing this article, We share some food packaging boxes with color printing and logo printing.
ReplyDeletecustom burger boxes
custom pie boxes
custom cereal box
french fries boxes
custom cardboard boxes
Kraft Paper Bags
Brown Paper Bags
Custom Paper Bags
Custom Printed Paper Bags
custom Kraft boxes
This comment has been removed by the author.
ReplyDeleteI literally prefer The Cosmetic Boxes for acquiring various types of product packaging. My recent experience was of custom soap boxes. It was brilliantly good. They provide me endless customization options and I got all the customization promised by them. Moreover, they guarantee me a long-lasting usage of these boxes and guess what? It was true as I used these candy boxes for a long period. I recommend you to visit their site and place your order to get a great boost for your business.
ReplyDeleteThis comment has been removed by the author.
ReplyDeleteThis comment has been removed by the author.
ReplyDeletenice overview about boxes. Custom Printed handle boxes
ReplyDeleteHi. you have posted great article, it really helpful to us.. I will refer this page to my friends; I hope you will like to read.
ReplyDeleteThe Custom Boxes
Thanks for showing that kind of knowledge on your portal.You have done all good. You can do better than before. I have learned a lot of information from this webpage.
ReplyDeleteCustom Boxes Mart
I like your design how you cover your boxes with fabric.I give gift to my wife mother on her birthday yeah its to much funny that i give a gift to my wife mother because i think generally people do not give gift to their mother in law.I give her a chocolate boxes cover with different kind of chocolate.
ReplyDeleteFor the boxes you can check this website, this is good site for such boxes. https://www.cityofpackaging.com/
ReplyDeleteThis comment has been removed by the author.
ReplyDeletePopcorn cones are very important for the marketing and branding of popcorn cones. They are good for the small and medium scale business. So, by following these tips, you can get your business at the high level.
ReplyDeleteThis comment has been removed by the author.
ReplyDeleteNice and informative post! Thanks for sharing!
ReplyDeletePrinted boxes are very important for the marketing and branding. They are good for the small and medium scale business. So, by following these tips, you can get your business at the high level.
ReplyDeleteThanks for the idea!
ReplyDeleteCorrugated packing style.
Loved the article, there is a great mix of detailed information for businesses to start taking advantage of social media. I found it great that you included the fact that growing on social media takes engaging with your audience as it’s one of the biggest things our company tries to emphasize on. Wonderful article.
ReplyDeleteCustom Printed Boxes
Custom CBD Boxes
The Custom Pack is a print packaging solution company dedicated to provide high quality packaging for a plethora of retail businesses. With a team of highly skilled professionals that have an eye for detail, the Custom Pack brings you a range of packaging types and designs.
ReplyDeleteWe offer custom boxes that give you full liberty of customizing the entire packaging at every step. Packaging is the first thing a customer notices. It has to be spot on to appeal to the customers. The visual appeal ticks a customer before they could actually choose a product. Packaging is the first impression we are committed to make that leaves a lasting impact on the customers.
ReplyDeleteCustom Boxes with Logo
I'm wondering if our plastic gift boxes can be covered? :)
ReplyDeleteWe offer custom boxes that give you full liberty of customizing the entire packaging at every step. Packaging is the first thing a customer notices. It has to be spot on to appeal to the customers. The visual appeal ticks a customer before they could actually choose a product. Packaging is the first impression we are committed to make that leaves a lasting impact on the customers.
ReplyDeleteCustom Packaging Boxes USA
Amazing tips to cover box in fabric. This is eye catching. Thanks a lot.
ReplyDeleteMarketing Agency | Web Development | E-Commerce | ERP
Great job! Your article is so informative. I really like it.
ReplyDeleteThank you for sharing DIY for decorating box, this will be helpful for readers who are looking for this type of idea.
ReplyDeleteshippers supply Calgary
https://realitypaper.com/wholesale-soap-packaging-boxes-uk-give-your-soap-products-a-customized-look-at-affordable-rates.html
ReplyDeleteThanks for sharing! What’s better than letting people know they’re communicating with the real deal? The best site muchfollowers to buy cheap Instagram followers, likes and views!
ReplyDeleteVery useful information shared in this Blog, nicely written! I will be reading your articles and using the informative tips. Looking forward to read such knowledgeable articles.
ReplyDeleteFor Custom Packaging Boxes and Commercial printing, Please visit Printingblue .
Thanks for sharing such a wonderful piece of information. The above information is directly relevant to Oil Packaging Boxes that will help the buyers learn more about packaging options.
ReplyDeleteby: custom boxes wholesale
SoftAge Information Technology Limited is a prestigious leader in the digital landscape dedicated to digitize, store and manage the valuable assets of your organization-the information. Our forte lies in offering Document Management Solutions, KYC Management, Physical Verification, E-Governance, Warehouse Management and Secure Shredding.
ReplyDeleteLast Mile logistics company
This looks incredible and your website is really good for me. Thanks.
ReplyDeleteCPP Boxes
Berikut adalah rekomendasi 20 game poker terbaik yang dapat Anda mainkan di seluler.
ReplyDeleteGame Poker
READ CAREFULLY TO HELP SOMEONE
ReplyDeleteMy name is clara i'm from uk,i want to use this opportunity to disclose a vital information which I was asked not to.i have a brother who work as an anonymous he was the one who told me about this FREE CARD that you can used in buying and cash out a limit amount of money.he further told me their manager specialize in doing FREE CARD that he his going to send me his email but i should not expose him to manager in case he ask me how i got his email, that i found it on the internet so two days after i contacted him he reply was what's your name and how did you got my email which i told him exactly what my brother told me so after that he further asked me how he can be off help to me which i did by explaining my financial situation.After my explanation he asked some question which i answer then he reply by telling me he his a God fearing man that he was touch by my story that his going to help me.i was so happy he didn't rejected my offer. So after the interaction he ask me to give him some days that he will get back to me,then after a week interval in the morning i receive a package unknowingly to me he was the FREE CARD follow by the instruction how am going to register and used it.today making it a year plus that have been using this FREE CARD. NOTE;my major aim of revealing this information is because someone out there is passing through financial challenge you can as well reach him via email [officialfreecardmanager@gmail.com]
TRY YOUR LUCK WITH GOD ALL THINGS ARE POSSIBLE
People prefer to store products in rooms in beautiful boxes to prevent the room from looking odd. What can be a better option than cube boxes? This packaging style gives enough space and provides a pretty look so people can put it anywhere in the room.
ReplyDeleteAmazing site.
ReplyDeletevisit our website for custom boxes
Searching for the best free PC game? Regardless of whether you’re down and out or simply parsimonious, free is a value direct that interests toward everyone’s satchel.
ReplyDeletecoolmathgameshub.xyz
Amazing site.
ReplyDeletevisit custom boxes.
https://procustombox.com/
We create branded boxes with logo. Our specialists are highly qualified and successfully fulfill orders of any complexity.
ReplyDeleteIn the manufacture of packaging with a logo, Mailer boxes and cardboard lodgments are used. We supplement designs with cut-out logos,uv spot, embossing, foil. We have a huge selection of decorative materials and product design methods. We are successfully implementing the most creative ideas, please contact us!
Custom Packaging Boxes
Custom Boxes
I think that informational articles should be more like yours. By that I mean they should have character. Your article had character and is persuasive. Your views are very interesting. Business Card Boxes Wholesale
ReplyDeleteGreat post I like it very much keep up the good work.
ReplyDeleteCosmetic boxes Indiana
Cosmetic Display boxes Indiana
prescription computer glasses are designed to combine stylish looks with top-quality eye protection. Stay focused on the game with syghtglass latest gaming eyewear collection which block blue light micron anti-blue ray protection eye strain. Buy best frames prescription gaming glasses.
ReplyDelete* do gaming glasses work
* anti blue ray glasses
Great Information sharing .. I am very happy to read this article .. thanks for giving us go through info. Fantastic nice. I appreciate this post. and thank you for sharing an amazing article…
ReplyDeleteVisit our website for Customized Boxes..
https://procustombox.com/
I am very much pleased with the contents you have mentioned. I wanted to thank you for this great article.
ReplyDeleteknives out daniel craig coat
thanks for your valuable post
ReplyDeletebuy 10k instagram followers
We deliver custom packaging for small business globally with the best turnaround time in the world. We are specialized in providing custom printed household boxes to our valued customers.
ReplyDeleteThe Great Packaging Ninjas Company (GPNC) is a USA company that manufactures custom and stock corrugated boxes, point-of-purchase displays, digital print and packaging, labels and flexible packaging, folding cartons, and protective packaging. The company also distributes shipping and moving supplies. We make exclusive Custom Candle Boxes in almost all the sizes and shapes you cannot even imagine. We have a wide range of custom sizes available for Candle Packaging Boxes; you have the liberty to choose among all or you can also get your Custom Printed Boxes size just as you want.
ReplyDeleteCBD Bath Bomb Boxes
Custom Kraft Boxes
Custom Soap Boxes
Custom pillow boxes
Custom Sleeve boxes
You make so many great points here that I read your article a couple of times. Your views are in accordance with my own for the most part. This is great content for your readers.
ReplyDeleteCustom Cigarette Boxes
Cigarette Boxes
This comment has been removed by the author.
ReplyDeletelip gloss packaging should be best. so go order lip gloss packaging from packaging republic
ReplyDeleteThankx for sharing this article. Its really informative article. I really enjoy your site I am waiting for new article.
ReplyDeletecigarette boxes
vape cartridge packaging
Nice post Thanks for share
ReplyDeleteVape packaging boxes
Custom CBD Oil Box Packaging
Nice post Thanks for share
ReplyDeleteVape packaging boxes
Custom CBD Oil Box Packaging
enjoy your movie with pop corn. pop corn boxes is best
ReplyDeleteIt is a very informative post thanks for sharing the information.
ReplyDeletedie cut Cereal boxes
wholesale Bath Bomb boxes
We are a Team of professional traders, Trading the financial markets for our close clients and investors since march, Finally decided to go live WORLDWIDE this December.We have created a very open and transparent business model, Where our investors can see each and every trade taken, Profit and loss booked in real time, We have Live Brokerage Accounts open to members vetted and fully verified by myfxbook.
ReplyDeleteA decent approach to convey and straightforward.Here I need to show you my Business which is about Popcorn Boxes. Our Popcorn Boxes which are printed exclusively with your brand logo and name will surely love by customers because we are working with these boxes for almost a decade. Our cone-shaped Popcorn Boxes are a must-try because of their unique shape and high-quality material.
ReplyDeleteCustom Hotdog Boxes
French Fry Boxes
Burger Boxes
Pink Donut Box
Noodle Boxes
Custom Cereal Boxes are assuming a significant part in the packaging business, particularly for the food business. Prior to purchasing Custom Cereal Boxes, you should deal with certain significant focuses.
ReplyDeleteIn the first place, you should think about the packaging plans for the Cereal Boxes.
Second, you should think about your necessities.
Third, you should know the best and dependable producer which is generally significant. Here are some important products in the market.
Custom Hot Dog Boxes
French Fry Boxes
Custom Noodle Boxes
A very nice and informative blog. I regularly read it. check out these cool custom lipstick boxes
ReplyDeleteI regularly visit this blog. Have a look at these awesome custom lipstick boxes
ReplyDeleteThanks for this in depth DIY. you can also out these customized favor packaging boxes to pack wedding favors and other small Christmas ornaments.
ReplyDeleteYour article clarify on boxes material. your article clear my idea on boxes. we also manufacturer Eyeliner Boxes
ReplyDelete
ReplyDeleteEither you are using triangular shaped Chocolate boxes to attract customers or Custom Printed luxury chocolate packaging to lure young children towards chocolate, these boxes will increase the showcase appeal and beauty!
Thanks for sharing this kind and informative article with us. Keep sharing. If you want to know about the depth information about Custom Boxes Wholesale you come to visit us
ReplyDeleteThis comment has been removed by the author.
ReplyDeleteThis blog is great in the information that it delivers! it has helped me find so much relevant information. I am sharing another link for customized packaging that might come in handy for you all! there is a wide variety for custom boxes.
ReplyDeletehttps://www.halfpricepackaging.com
Nice post, I really enjoyed reading this article, it explains everything in a simple way. I will check this blog for such important information and will continue to search for it.
ReplyDeleteTop 7 Tips to Create Soap Boxes for Soap Packaging for Your Supplies
Great post, you have pointed out some great points , I also think this s a very excellent websitecustom boxes custom boxes
ReplyDeleteAll details you describe in your blog post about bath bomb packaging is very informative for me. Bath Bomb Packaging provides with suitable price.
ReplyDeletebest wholesale cookie boxes today
ReplyDeleteAll details you describe in your blog post about Soap boxes is very informative for me. Soap boxes provides with suitable price.
ReplyDeletebath bomb packaging
lip gloss boxes
burger boxes
hair packaging boxes
lipstick boxes
Nail polish boxes
Soap boxes are uncommon endowments so their packaging ought to likewise be novel and imaginative.Soap boxes are a perfect method.
ReplyDeletebath bomb packaging
lip gloss boxes
burger boxes
hair packaging boxes
lipstick boxes
Nail polish boxes
Bath Bomb Boxes are uncommon endowments so their packaging ought to likewise be novel and imaginative.eco friendly bath bomb boxes are a perfect method.
ReplyDeleteSoap boxes
bath bomb packaging
lip gloss boxes
burger boxes
hair packaging boxes
lipstick boxes
Nail polish boxes
All details you describe in your blog post about Pre roll packaging is very informative for me. Pre roll packaging provides with suitable price.
ReplyDeleteSoap boxes
bath bomb packaging
lip gloss packaging
burger boxes
Nice post. For more info about Pre roll packaging enjoying a lot while reading this beautiful article.
ReplyDeleteSoap boxes
bath bomb packaging
lip gloss packaging
burger boxes
Thanks for sharing this blog is soo informative if you need Blank cigarette boxes then you visit Empty Cigarette Boxes and take your own style boxes.
ReplyDeleteWe offer you great and top class packaging If you are looking beautiful blank cereal boxes for your product then click on this link
ReplyDeleteBlank Cereal Boxes
And if you are looking cardboard food boxes, click on this link Cardboard Food Boxes
We offer you great and top class packaging If you are looking beautiful blank cereal boxes for your product then click on this link
ReplyDeleteBlank Cereal Boxes
And if you are looking cardboard food boxes, click on this link Cardboard Food Boxes
Bath Bomb Packaging provide you the best bath bomb packaging, which will protect your customer as well as give it a perfect look.
ReplyDeleteSoap boxes
Thank you for sharing lip gloss packaging at wholesale that's great job.
ReplyDeletelipstick boxes
Nail polish boxes
Bei stark bis extrem inkrustierten, das heißt verengten Rohrleitungen, kommt die hydromechanische Rohrreinigung zum Einsatz. Auch hierbei verwenden die Fachleute von Kuchler Service weder Säuren, Laugen noch umweltbelastende Spülmittel. Und dennoch erreichen sie zügig das Ziel: eine saubere Leitung – durch eine rundherum saubere Arbeit, die mehr Effizienz bringt als Kosten nach sich zieht.
ReplyDeleteRohrreinigung deggendorf
ReplyDeleteBlank Cigarette Boxes provide you the best Blank Cigarette Boxes, which will protect your customer as well as give it a perfect look.
Way cool! Some very valid points!
ReplyDeletepen boxes
cob today
ReplyDelete833 Area code
Chiclet teeth
When was running invented
click here and buy best wedding dresses
ReplyDeleteRigid boxes are perhaps among the most popular choices for brands to display their products, attributable due to high-value of these custom boxes.
ReplyDeleteBei stark bis extrem inkrustierten, das heißt verengten Rohrleitungen, kommt die hydromechanische Rohrreinigung zum Einsatz.
ReplyDeleteAuch hierbei verwenden die Fachleute von Kuchler Service weder Säuren, Laugen noch umweltbelastende Spülmittel. Und dennoch erreichen sie zügig das Ziel:
eine saubere Leitung – durch eine rundherum saubere Arbeit, die mehr Effizienz bringt als Kosten nach sich zieht.
die Fachleute von Kuchler
Get order from Packaging Republic of custom rigid boxes wholesale with free shipping at best price in USA. We are masters and experts in custom packaging solutions. If you need the Best Pre Roll Packaging, contact us.
ReplyDeleteclick and buy Front Embroidered Shirt .
ReplyDeleteClick and buy Front Embroidered Shirt
ReplyDeleteNice post. Well what can I say is that these is an interesting and very informative topic on cheap packing supplies
ReplyDeletePretty good post. I have really enjoyed reading your blog posts.Any way Here I am Specialist in Manufacturing of Movies, Gaming, Casual, Faux Leather Jackets, Coats And Vests See Luke Skywalker Poncho
ReplyDeleteพนันออนไลน์ www.warr8.com พนันออนไลน์ ที่มีการเดิมพันครบวงจร รวบรวมเกมส์ดังจากค่ายต่างๆไว้มากมาย สมัครง่าย เล่นง่าย เปิดให้บริการ พนันออนไลน์ได้เงินจริง
ReplyDeleteSo, when the three major tactics have completed their tasks. What aspect will force a customer to put your commodity in the bag once they have effectively drawn customers to your brand? This is a compilation of the product’s attributes and advantages. All of the specifics should be printed using advanced printing techniques and the most appropriate color custom boxes wholesale combinations for the label. Your customer will be able to instantly read the specifications of your item for which they had visited the store. You have the option to print:
ReplyDeleteNice blog, great information for sure. Budgetboxguy supplier offers the best boxes, moving supplies and commercial boxes. Order online for shipping boxes, packing boxes and wardrobe boxes in Calgary.
ReplyDeleteplastic storage bins Calgary
Thanks for sharing this article, please keep sharing such kinds of article. If you are looking any type of customized packaging boxes then just visit our site BoxesMe and get your order at wholesale rates.
ReplyDeletePre Roll Packaging
Lipstick Boxes
Eyelashes Box Template
It is an informative blog. It has helped me find relevant information. Here is another informative link for CANDLE BOXES
ReplyDeletethat might come in handy for you all.
ReplyDeleteYour blog is more informative and attractive thanks for sharing if you need this Blank cigarette boxes visit Blank Cigarette Boxes and order your own style.