We bought some couches from a resale shop. They looked good and the upholstery matched our other couches, but the color of the wood work was lighter than the other furniture in the living room. They actually came with palm tree pillows so we re-did those with varying shades of brown fabric from JoAnn's Fabrics. A year later we finally decided to do something about the wood. It does take a lot of time(about a week from start to finish) but it was well worth the time and effort.
Here is the before(of both couches):
 |
We got some stripping gel from our carpenter uncle which speeds along sanding time. |
 | |||
| If the couch has a lot of detailing and lacquer it takes more time to sand. As we went we vacuumed the dust which minimized the mess. |
Make sure when you tape, you get all of the spaces around the wood and upholstery, this is very important. I would say you should take your time on this step because the tape is the only thing separating your couch and the stain from disaster. We should have added an extra strip of tape to protect the fabric better. If you do get stain on the couch, you can get it off while it's still wet with mineral spirits.
We used a spatula type thing to get the tape into all of the cracks and crannies. You can also use a butter knife.
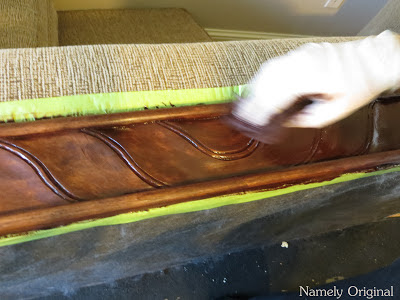
When you are done sanding all of the wood and have taped it, you can start staining. We picked a color that matches almost exactly with the other furniture in the living room.
The longer you leave the stain on the darker it will get. We left the stain on for about 2-3 minutes. The wood will also probably absorb and darken even after it's wiped off. If you want it darker, you can add another layer of stain.
After you put the stain on, I suggest putting 3+ coats of lacquer. The more coats you put, the better protected it will be. Use any cheap paintbrush.
This is our living room now! It looks so much better, don't you think? We probably only paid about $400.00 for the couches/pillows, and the rest of the supplies were free because we have a very generous uncle! You can see some of his carpentry creations here at Intelligent Design Woodwork.
 | |||
This is the other side of the living room, our mantle and fireplace.
So, what do you think? I know it seems like a lot of work and honestly, it is. But I have to say a little DIY never hurt anyone. It turned out better than we hoped!


Hi Emily! I just found this post, and thus your blog, via Roadkill Rescue. I love the very subtle change that you made and how such a small change can really change the whole look. I love it and what a neat couch to find! I love those curves!
ReplyDeleteI love that you also have tutorials and recipes, I too love a good tutorial and getting my hands dirty.
All the best,
Aubrey
Project Lovegood
Thanks Aubrey,
Deleteit's so nice to hear from other people who share my interests! Thanks for visiting, and come back soon!
Emily
It looks like a brand new sofa.........I Love It !!!
ReplyDeleteThanks!
DeleteWow, great job! They look soooo much better with the dark stain!
ReplyDeleteFound you through Roadkill Rescue.
DeDe@DesignedDecor
Just found you through Roadkill Rescue and am now following you.
ReplyDeleteThanks so much! I'm glad to hear you like our stuff
DeleteClever! Love the update
ReplyDeleteLoving it!
ReplyDeleteSo lovely. Who wouldn't be prod of it?:) Great job!
ReplyDeleteHopping by and following your lovely blog's twitter and Pinterest. I blog @ Getting Healthy with Essential Oils
I am also inviting you to join Tiddle Diddle Handmade Shoppe's first giveaway event.
Great job! Your living room is lovely. Love how you have decorated your mantel and niche! Beautiful. I'm a new follower. Come over for a visit!
ReplyDeleteNice post. Stripping and sanding the wood seems like it is the hardest part. Thanks for posting.
ReplyDeleteI am very happy to read such a wonderful blog which gives the helpful information. thanks for sharing.
ReplyDeleteVery good written article. It will be supportive to anyone who utilizes it, including me. Keep doing what you are doing – can’r wait to read more posts.
ReplyDeleteChandeliers
This is the type of information I’ve long been trying to find. Thank you for writing this information. Dslr camera price in pakistan
ReplyDelete바카라사이트
ReplyDelete바카라사이트